NFT Minter NFTetris: Minting the Game Result as NFT on the Ethereum Blockchain
With our new game coded in React with Typescript, developed on Hardhat, deployed on Next.JS, connecting via Ethers.js and MetaMask as CryptoWallet we are going Blockchain.
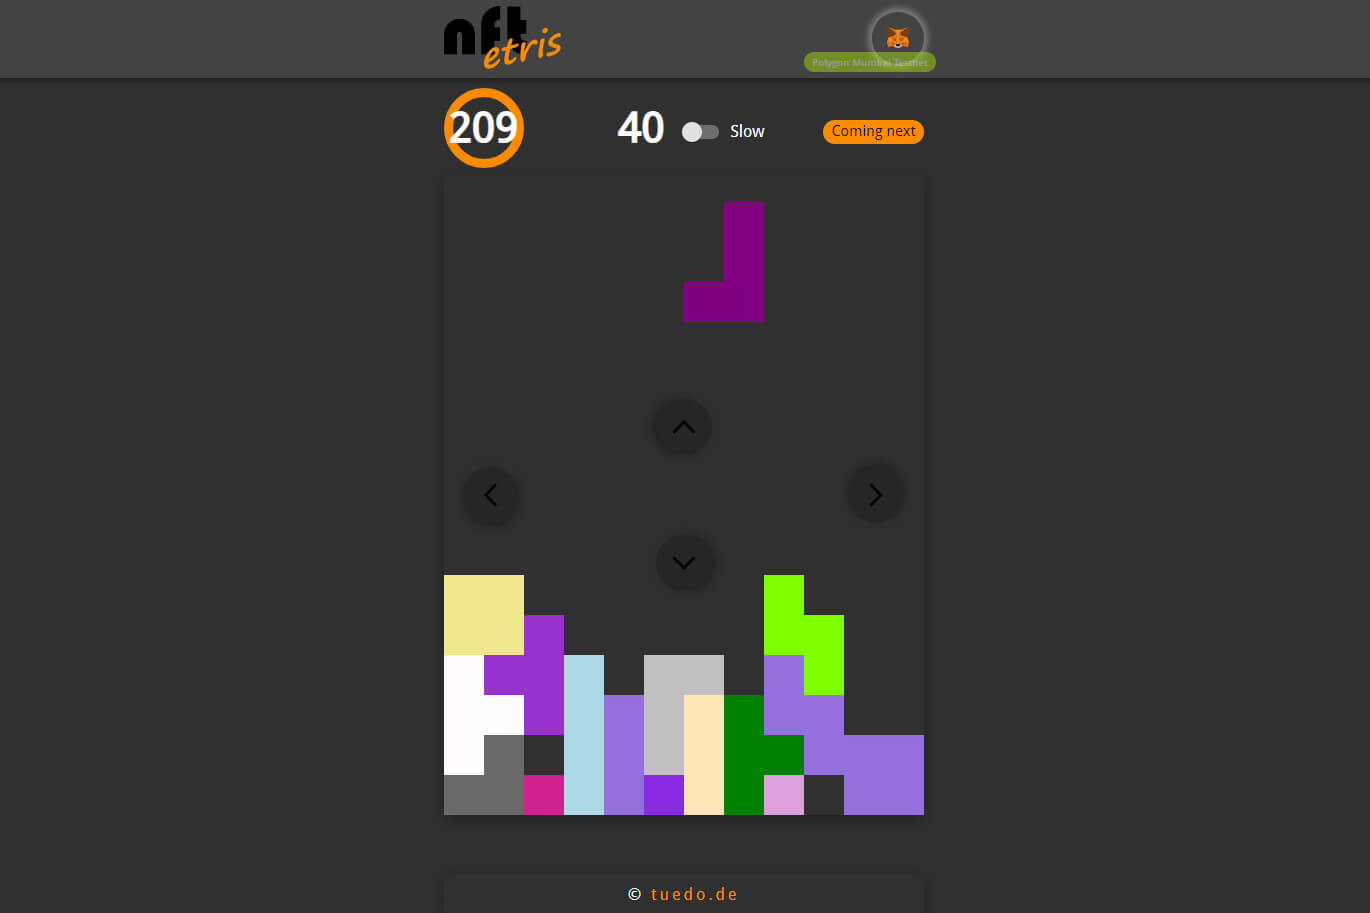
Our new monorepo just published on Github is now in beta and can currently mint SVG game results of a Tetris clone on the Polygon Testnet Mumbai.
The motivation for this entry to the Blockchain world was the Moralis Avalanche Hackathon December 2021 to January 20221, where this Web3 app was supposed to be a contribution. Admittedly, we missed the time limit, so we decided to extend the usability of NFTetris to NFT platforms like OpenSea by switching to Polygon. We got the idea of using SVGs as NFTs from a Youtube tutorial video by Patrick Collins2, where he demonstrates the possibility of publishing kind of art as simple SVG on-chain to the blockchain.
Github Repository of the Code
Live-Demo as Vercel App (Beta version)
The idea to mine the SVGs on-chain, however, we soon dropped, not because the idea was bad, but because our SVGs get bloated in size very quickly, which would have been noticeable in the minting costs. So on-chain was not an option in this specific case. However, NFT.Storage makes it easy for developers to store SVGs with metadata decentralized and available in perpetuity on the IPFS and Filecoin network.
Randomness in the blockchain as a result of human behaviour
In the said Youtube video by Patrick Collins, the difficulty of randomness in a deterministic system like a blockchain in particular plays a major obstacle and can be overcome by using oracles like Chainlink. Our idea was to replace the randomness of a blockchain oracle with the randomness of a human player. And since SVGs can consist of rectangular shapes and blocks, the thought of a Tetris clone was not far away. Thus NFTetris was born.
Since only one NFT should be deployed per minting, we opted for the traditional ERC721 contract, but an adaptation to ERC1155, where whole batches of NFTs can be minted, would be easy to implement in the given monorepo.
The basis of NFTetris, the collection contract, is written in Solidity. We have taken OpenZeppelin's ERC721 URIStorage as the basis of the contract, where the tokenURI is written to the blockchain. We have made slight modifications to the contract for the NFT platform OpenSea as operator, although at the moment it is not entirely clear how far the support for the Mumbai Testnet goes.3
The core functions of the collection file NFTetris.sol are the constructor, which generates a new collection contract, and the minting function mintNFT.
// pragma solidity ^0.8.4;

constructor(
    string memory _name,
    string memory _symbol,
    address _proxyRegistryAddress
) ERC721(_name, _symbol) {
    _tokenId.reset();
    proxyRegistryAddress = _proxyRegistryAddress;
}

function mintNFT(string memory _metadataEncoded) public returns (uint256) {
    uint256 _newTokenId = _tokenId.current();
    _mint(msg.sender, _newTokenId);
    _setTokenURI(_newTokenId, _metadataEncoded);
    _tokenId.increment();
    emit CreatedSVG_NFT(_newTokenId, _metadataEncoded);
    return _newTokenId;
}
Hardhat for the Smart Contract development
For the development we took the excellent tool Hardhat, which is so excellent that with our decades of experience in blockchain development ;-) as true gourmets we never missed any other deli food.
Hardhat comes out of the box with so much functionality, full Typescript support and provides its own runtime environment that you wouldn't think of using any other tool for smart contract development in Solidity. Besides, testing with Chai and Ethereum Waffle is easy to integrate and intuitive. Who could ask for more?
In the package hardhat of the monorepo the contract is deployed and the ABI combined with a JSON file containing the most important contract data is copied to the frontend folder of Next.JS under the folder contracts.
Later in the frontend inside Next.JS and the React Components, this JSON file is read and used as the basis for the connection to the network via MetaMask extension in the browser (which of course has to be installed).
Let's get to the actual game, a Tetris clone in the frontend. One can rightly ask why it was React of all systems that was used for the animation and logic of the game, and in hindsight I would say that other paths would have led to success as well. As a developer, you quickly realize that React was not created for these purposes and when calculating the animations, you quickly find yourself in the confusing jungle between virtual dom, real dom and stale closures.
There are of course workarounds for this, but frankly, does it really make sense to provide a mirrored reference to this state variable for every state variable via useRef, just to get a reliable value from a variable between the life cycle of a component and its rendering. From experience I would say that this would have been easier to handle with Svelte, but especially SvelteKit has its own flaws, especially regarding deployment and script bundling. But maybe these childhood diseases of SvelteKit are overcome by now and it would have been actually easier.
So that's how we ended up with React and not GreenSock or Framer Motion and eventually it worked out. Well, per aspera ad astra you learn by the way a lot about the React life cycle of components. Designed as a Single Page Application SPA, Next.JS would not have been required for the actual game, but in order to have a secure API available as a web hook for emailing at the end, we built the entire frontend with all existing React components on Next.JS. A sidenote: Because it was designed as a game that runs mainly on the client, it can't play to Next.JS's strengths as far as Server-side Rendering SSR is concerned.
The Game: A Tetris clone
There are two constants that I would like to point out separately when looking at the game, with which one can influence the course, but especially also the behaviour and the costs of minting depending on the chain and network. Those can be found in the folder ./config/constants.tx within the Next.JS package.
export const MAX_COUNTER = 1000;
export const TRANSACTION_OPTIONS = {
    gasLimit: 6000000,
    gasPrice: 40000000000,
};
With MAX_COUNTER the maximum possible playing time in seconds is specified. It must be pointed out that the counter is not based on real time, but on the Window.requestAnimationFrame() of the browser. If the browser tab is not active at the moment, the game process freezes and the counter is not counting.
After starting the game on the welcome page, the game can be played like the classic Tetris. Points are awarded for an uninterrupted row of blocks, which can be doubled at a faster game speed (use the switch in the top center).

The game ends as soon as the counter exceeds MAX_COUNTER (default 1000 seconds) or the game sprites at the top have no more space around.
Now another modal dialog opens where the gamer can view the game result showing the most important traits (the SVG to be published is also presented). The gamer can now either discard the result after a confirmation prompt and start a new game (so far no results are permanently stored in the browser or a database) or he can intend to publish the game result as NFT. To do this, the gamer can select the available contracts (in the current mode only ERC721 is available) and enter the name and description of the NFT as metadata.
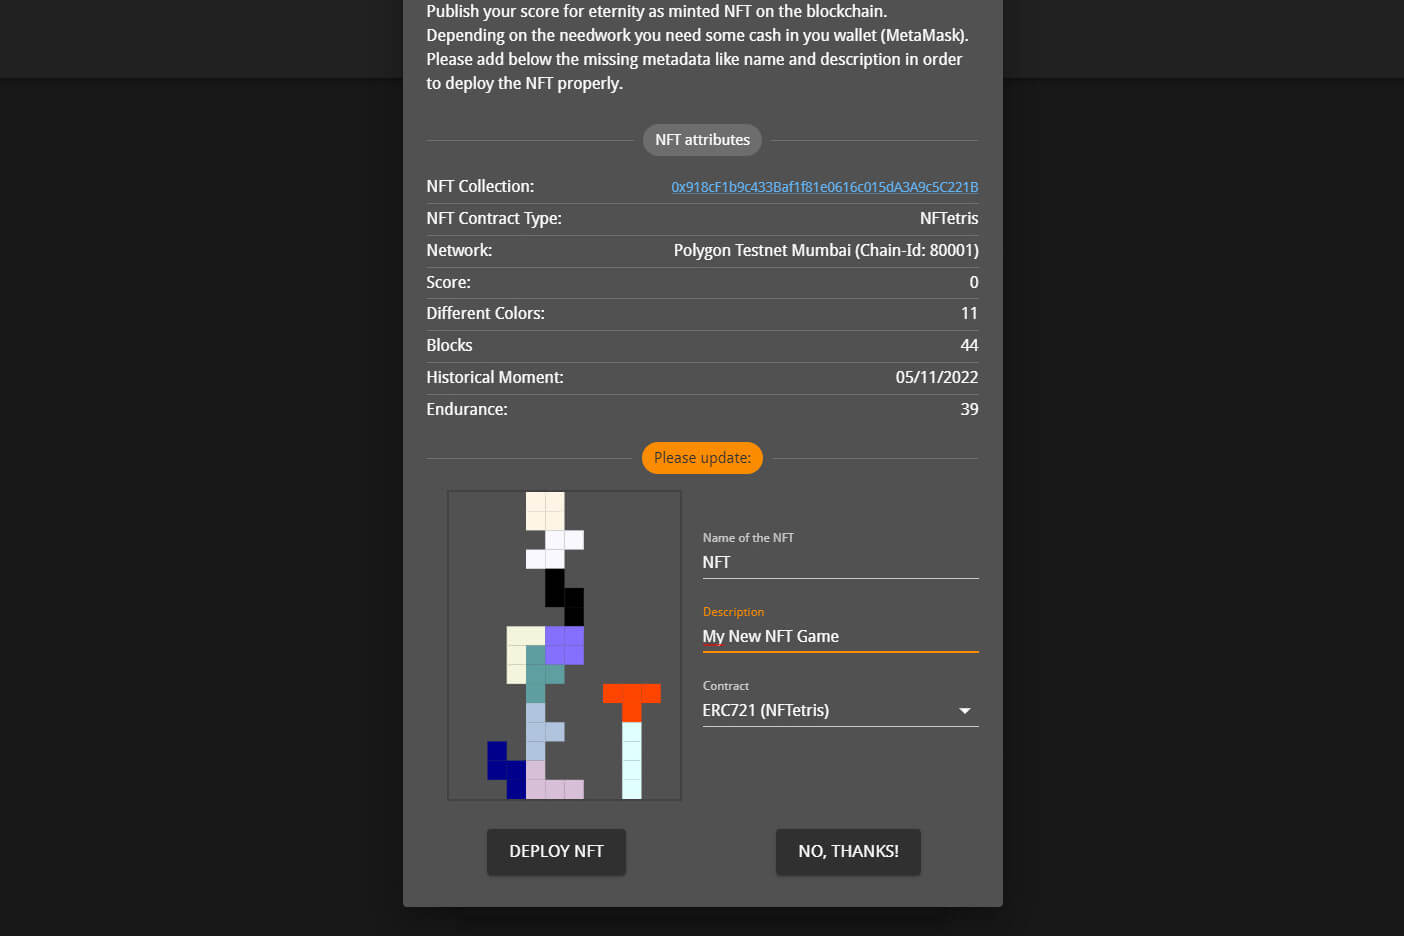
Once these entries have been made, he can click the DEPLOY NFT button and a new modal dialog appears. Now a whole series of queries is started, e.g. it is tested whether MetaMask is installed in the browser and whether the page has access to MetaMask. Error messages are displayed so that the user can make corrections. In particular, the user can use the Connect to MetaMask button to allow the page to have access to the crypto wallet. After the corrections, the deployment process can be restarted. Of course, the user must ensure that sufficient native cryptocurrency (e.g. MATIC for Polygon) is available in the account, otherwise the minting process will be interrupted. For test networks, there are faucets where you can obtain some virtual cash.
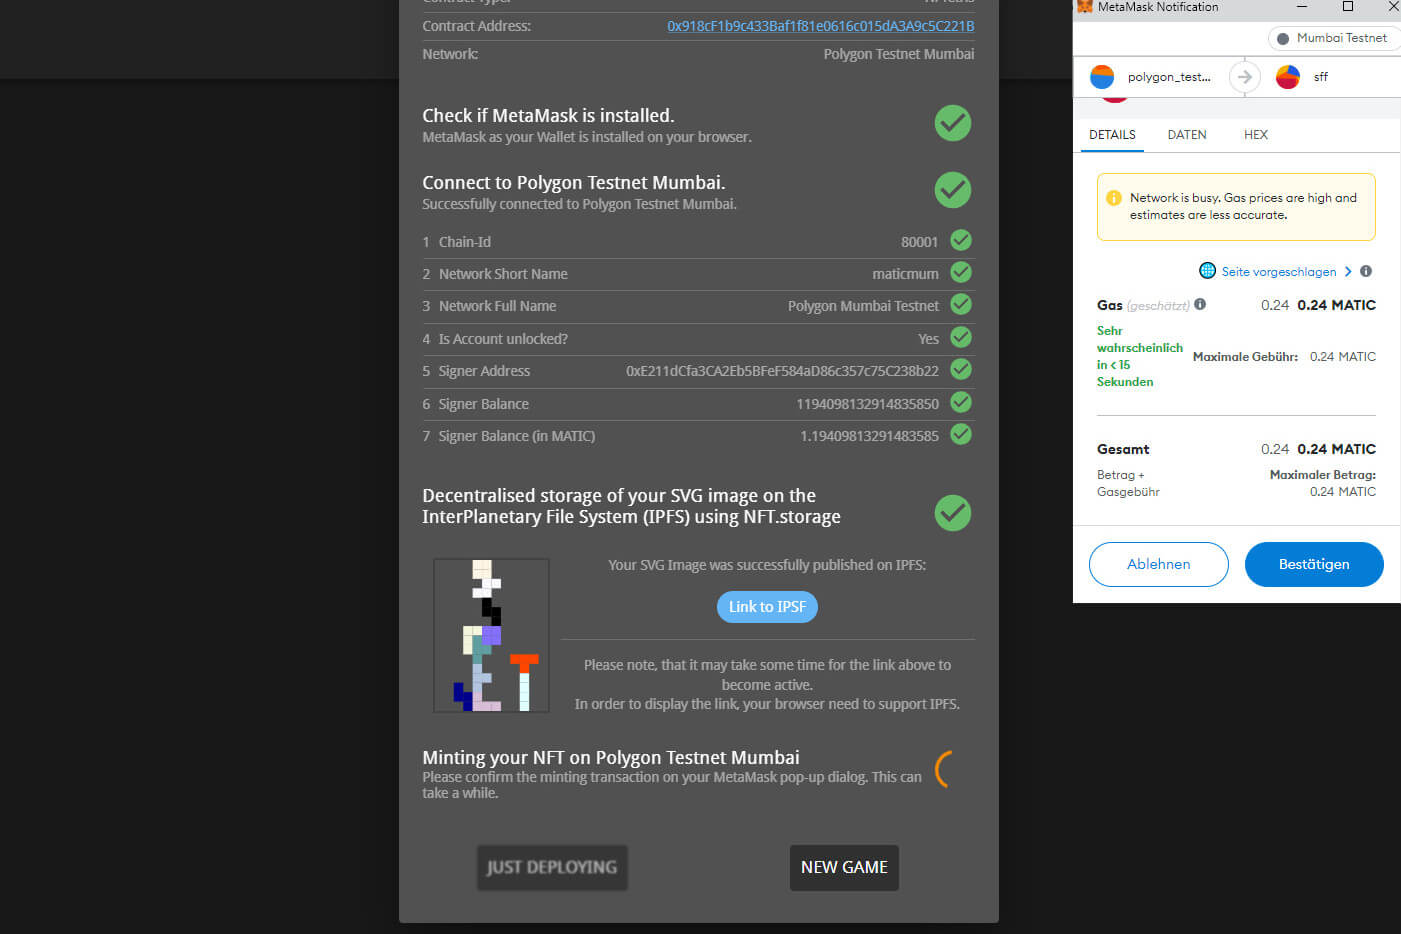
If there have been no complaints and the user has approved the estimated costs after prompting MetaMask in the browser, minting starts, which may take longer depending on traffic and gasLimit and gasPrice. In the current version, we have not yet programmed a timeout for minting, but this step may become necessary if the software switches to the mainnet.
If the minting was successful, a final modal dialog opens and displays the most important links to IPFS and the OpenSea trading platform. The token ID, the transaction details and the minting costs can also be viewed. Since this data is not permanently stored on a database, you can have this data sent to your email address.
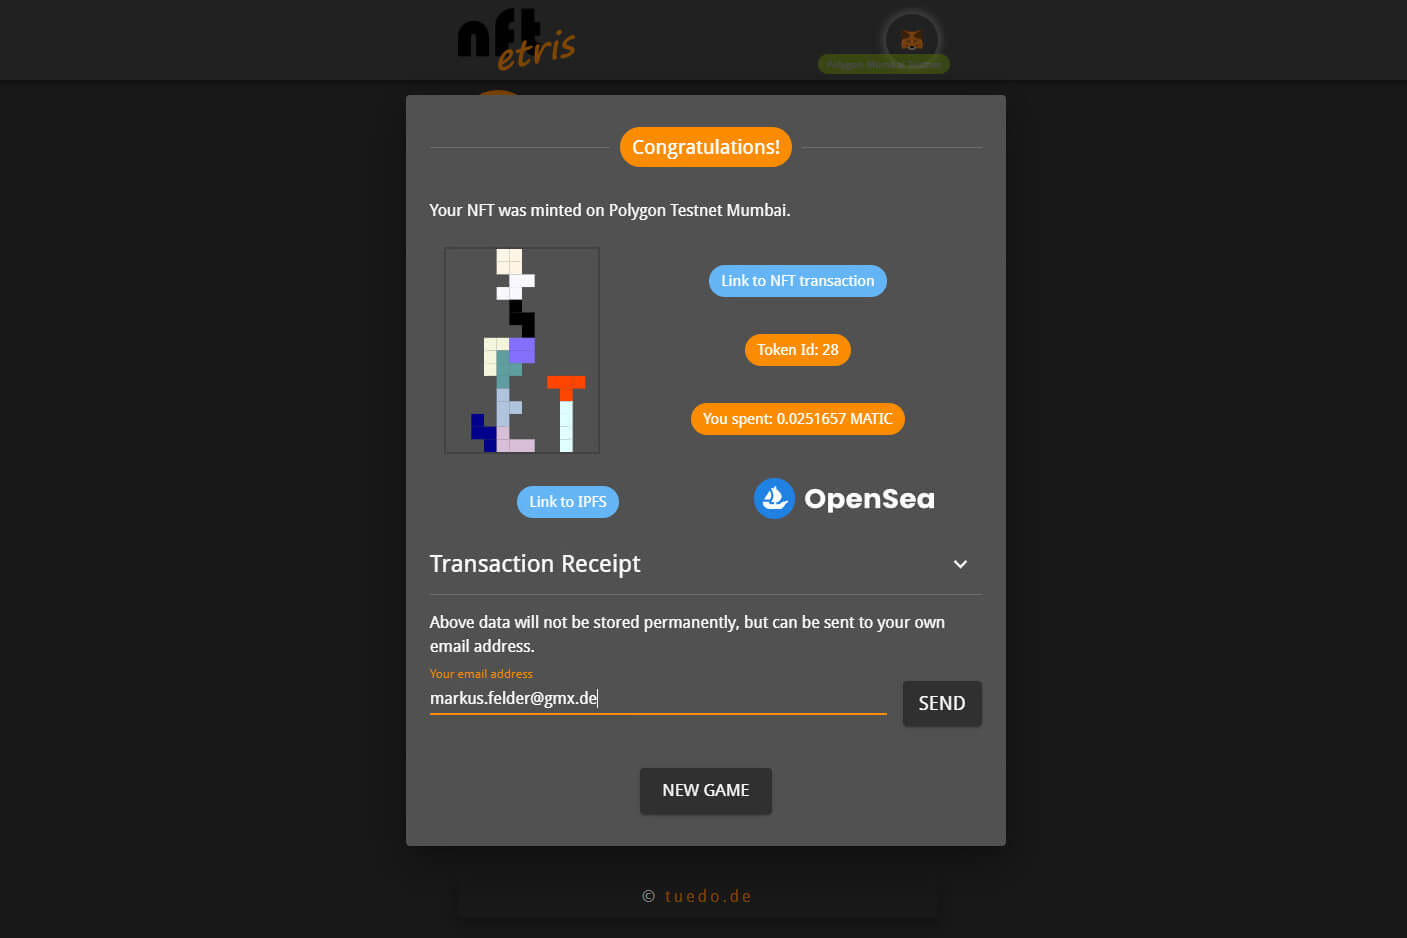
This last email process was the reason why we did not publish NFTetris as simple React SPA, but chose Next.JS as the basic framework, because it offers a secure API with same-origin policy out of the box. We trigger the sending of the mail via a webhook.
Looking forward: NFTetris for Blockchain Mainnet
Finally, I would like to draw attention again to the Hardhat development environment in the package of the same name. Making the contract and minting suitable for mainnet is not that complicated. In particular, the Hardhat deploy file in the deploy folder (currently named 01_deploy_nftetris.ts) needs to be adapted.
import { HardhatRuntimeEnvironment } from "hardhat/types";
import { DeployFunction } from "hardhat-deploy/types";
import { networkConfig } from '../config/network-config';
import { getChainId } from "hardhat";
import fs from 'fs';
import path from 'path';
const PATH = '../nextjs/contracts';
const FILENAME = 'contractValues.json';

type ContractsToDeployType = {
		type: string,
		message: string,
		contracts: {
			contract: string,
			label: string,
			args: string[]
		}[]
	}[]

const deployNFTetris: DeployFunction = async (hre: HardhatRuntimeEnvironment) => {
	const { getNamedAccounts, deployments } = hre
	const { deployer } = await getNamedAccounts();
	const { deploy, log } = deployments;
	const chainId = Number(await getChainId());

	let allContracts = {};
	const PATH_FILENAME = path.join(process.cwd(), PATH, FILENAME);

	try {
		if (fs.existsSync(PATH_FILENAME)) {
			allContracts = JSON.parse(fs.readFileSync(PATH_FILENAME).toString());
			log('######### Existing JSON file loaded');
		} else {
			throw new Error('No existing JSON file');
		}
	} catch (err) {
		log('######### No JSON file found. New JSON fill will be generated.');
	}

	log(`######### Deploy the contract(s) on ChainId ${chainId}`);

	const contractsToDeploy: ContractsToDeployType = [
		{
			type: 'erc721',
			message: '####### Deploy contracts of Type ERC721',
			contracts: [
				{
					contract: 'NFTetris',
					label: 'ERC721 (NFTetris)',
					args: ['NFTetris', 'NFTETRIS', '0x58807baD0B376efc12F5AD86aAc70E78ed67deaE'],
				},
			],
		},
	];

	let contracts = {};
	let counter = 0;

	outerBlock: for (let contractType of contractsToDeploy) {
		log(contractType.message);
		let contractsOfOneType = [];
		for (let contract of contractType.contracts) {
			log(`##### Deploy contract ${contract.contract} aka ${contract.label}`);
			try {
				const deployedContract = await deploy(contract.contract, {
					from: deployer,
					log: true,
					args: contract.args,
				});
				log(`### Successfully deployed contract ${contract.contract} to ${deployedContract.address}.`);
				counter++;
				const pathABI = path.join(process.cwd(), PATH, `abi/${contract.contract}.json`);
				let rawdata = fs.readFileSync(pathABI).toString();
				let contractAbi = JSON.parse(rawdata);
				contractsOfOneType.push({
					contractValue: contractType.type,
					contractName: contract.contract,
					contractLabel: contract.label,
					address: deployedContract.address,
					deployer,
					chainId,
					network: networkConfig[chainId]?.name,
					networkScanContract: networkConfig[chainId]?.scanContract,
					networkScanNft: networkConfig[chainId]?.scanNft,
					openSeaLink: `${networkConfig[chainId]?.opensea}/${deployedContract.address}/`,
					nativeCurrency: networkConfig[chainId]?.nativeCurrency,
					contractAbi,
				});
			} catch (error: any) {
				log(`####### An error occured: ${error.message}`);
				break outerBlock;
			}
		}
		contracts = { ...contracts, [contractType.type]: contractsOfOneType };
	}

	allContracts = { ...allContracts, [chainId.toString()]: contracts };
	// Write contractValues.json
	fs.writeFileSync(PATH_FILENAME, JSON.stringify(allContracts));
	log(`##### ${counter} contracts successfully deployed.`);
};

export default deployNFTetris
deployNFTetris.tags = ['all', 'erc721', 'polygonMainnet'];
In ./packages/hardhat/config/network-config.ts you should expand the data for the mainnet:
137: {
        name: 'Polygon Mainnet',
        scanContract: 'https://polygonscan.com/address/',
        scanNft: 'https://polygonscan.com/tx/',
        opensea: 'https://opensea.io/assets/mumbai',
        nativeCurrency: { name: 'MATIC', symbol: 'MATIC', decimals: 18 },
},
Both package.json in the root directory of the monorepo and the package.json file in the hardhat package must be extended with script directives for the mainnet.
In ./package.json as follows:
"scripts": {
    [...]
    "hh_deployPolygonMainnet": "npm run deployPolygonMainnet --workspace=packages/hardhat",
    [...]
},
And in ./packages/hardhat/package.json you need to add something like this:
"scripts": {
    [...]
    "deployPolygonMainnet": "npx hardhat clear-abi && npx hardhat --network polygonMainnet deploy"
},
The hardhat configuration file ./hardhat.config.ts must also be adapted. However, caution is advised, the respective data must be adapted to the individual conditions and requirements. In addition, the latest documentation should be consulted. Unfortunately, we cannot offer warranty for the correctness of the data.
And never forget in the jungle of blockchain development: Test, test, test before going live. I hope you enjoy our first steps into the fascinating world of blockchain technology, NFTs and its ecosystem.
- ↑A working link (May 2022) to the Moralis Avalanche Hackathon can be found here.
- ↑It cannot be emphasised enough that Patrick Collins' YouTube channel is a real gold mine for blockchain starters. His 16-hour free tutorial on Solidity, Blockchain and Smart Contracts deployed with Python is already a legendary piece of work.
- ↑There is an ongoing discussion about the degree of support for Polygon Testnet and Mainnet as operators in the OpenSea platform. In particular, this is about the proxyRegistryAddress in the isApprovedForAll method, that has to be overwritten.
